Reporting Center
Reporting server refers to the “Reporting Center” setting item mentioned in configure the south devices rules. the number is associated to server <x > setting. For example, if configure reporting center as 1 in south device rule, it will report to server1, if configured as 1-2-3, it will report to server1, server2, and server3 in parallel.
It supports up to 5 reporting servers setting independently. Each server support configuring many kinds of industrial communication protocols.
MQTT Protocol
MQTT (Message Queuing Telemetry Transport) is a lightweight messaging protocol designed for low-bandwidth, unreliable network environments, commonly used in IoT (Internet of Things) communication. It operates on a publish/subscribe model to ensure reliable message delivery.
Elastel gateway act as MQTT client to publish and subscribe data with MQTT broker.
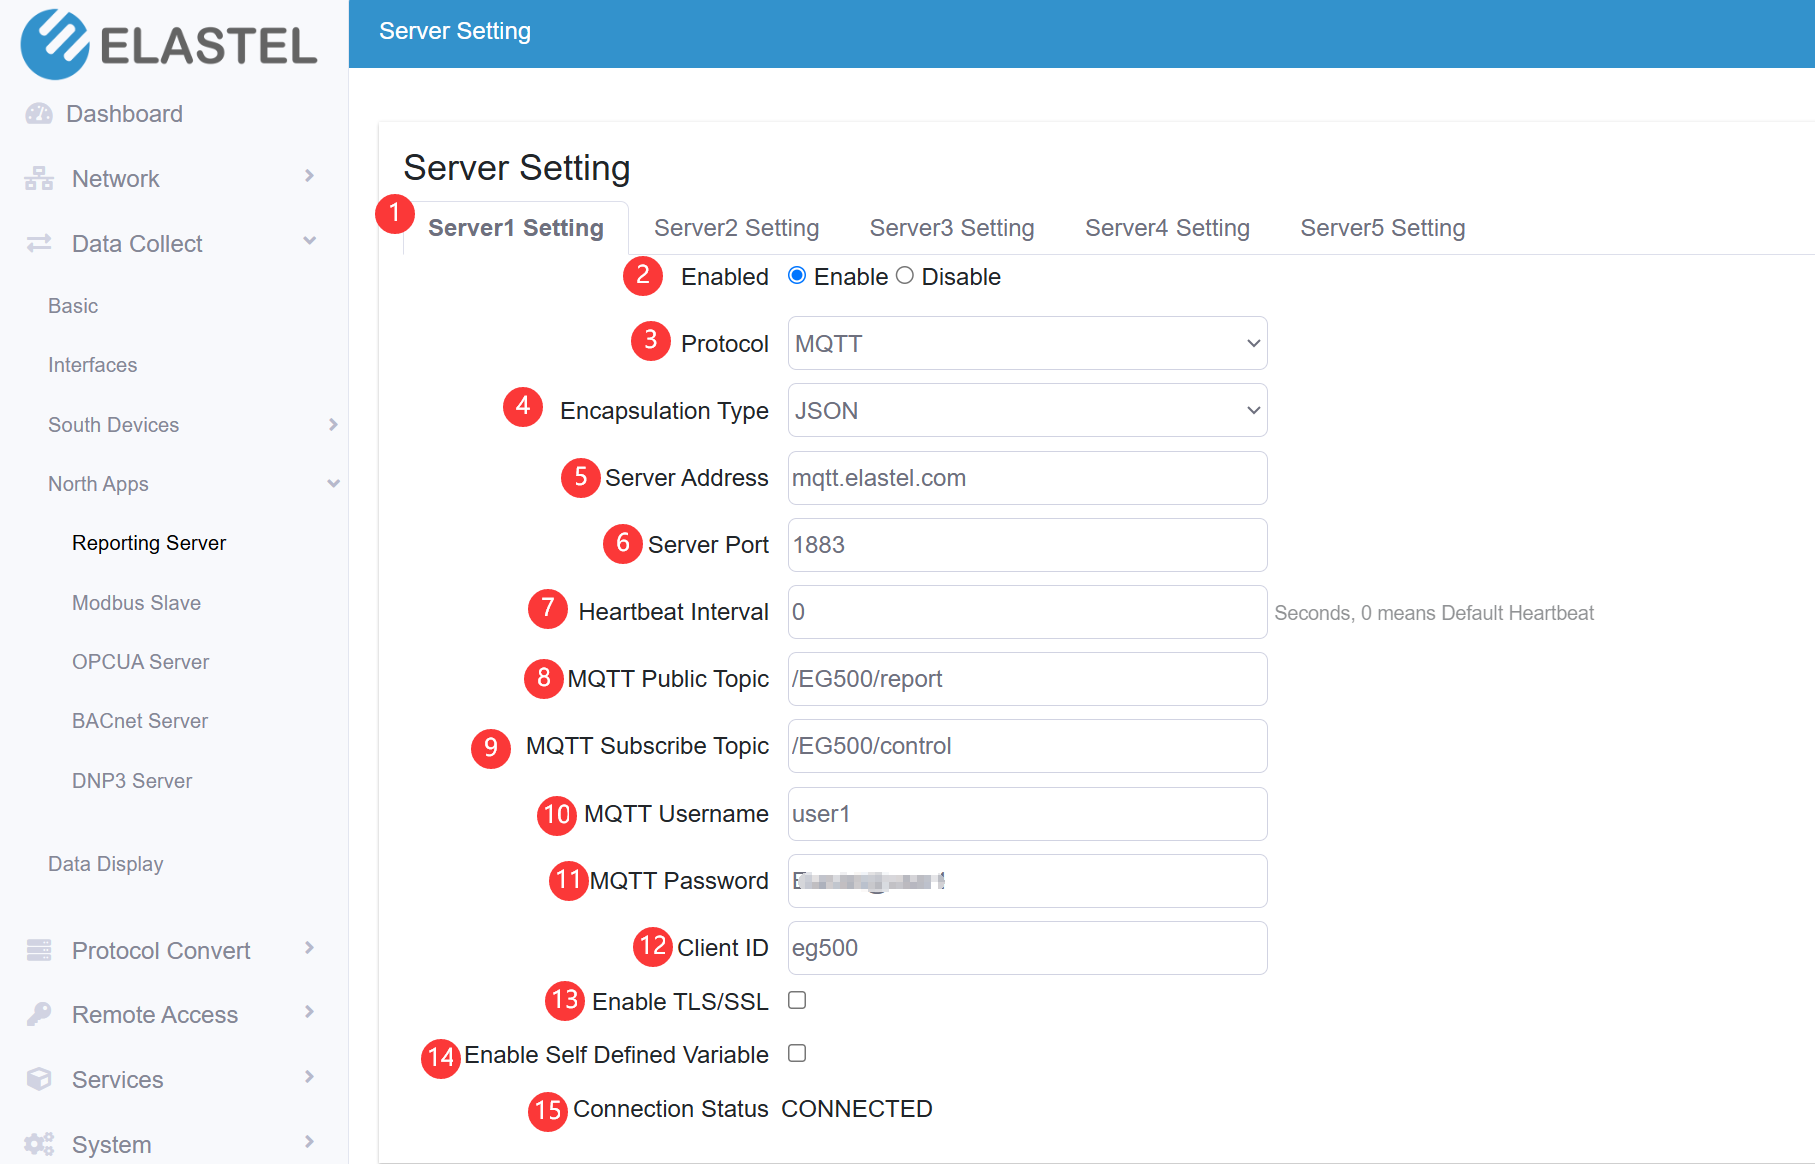
- Specify a server to configure
- Enable/Disable the server
- Select the communication protocol between Elastel gateway and the server, this section we select MQTT
- Select the Encapsulation Type for data format upload to server, options: JSON, Transparent
1. JSON format2. Transparent formatExample{ "ts":<timestamp>, "params":{ "<tag1 from south device rule>":<tag1 value>,"<tag2>":<tag2 value>… } }
{ "ts":1732876070827, "params":{ "Humidity":30.30,"Temperature":27.80,"DO0_tag":1 } }Example"Humidity":30.20,"Temperature":27.70,"DO0_tag":1 - Configure the Server address
- Configure the server port
- Configure the Heartbeat Interval, heartbeat is for keep alive connection between Elastel gateway and server
- Configure the MQTT public topic
- Configure the MQTT subscribe topic
- Configure the MQTT username
- Configure the MQTT password
- Configure the MQTT client ID
- Enable TLS/SSL certification, it provide three certificate type if enabled,
- CA signed server certificate
- One-way certification, request upload CA file
- Two-way certification, request upload CA file, public and private keys
- Enable self defined variable, this is specific add extra parameters in payload to match some cloud platform requirements
- Indicate the connection status
SparkPlugB Protocol
Sparkplug B is a specification designed specifically for IoT applications so that MQTT devices and applications can send and receive messages in a stateful way. Elastel gateway act as SparkPlugB MQTT client to publish and subscribe data with MQTT broker.
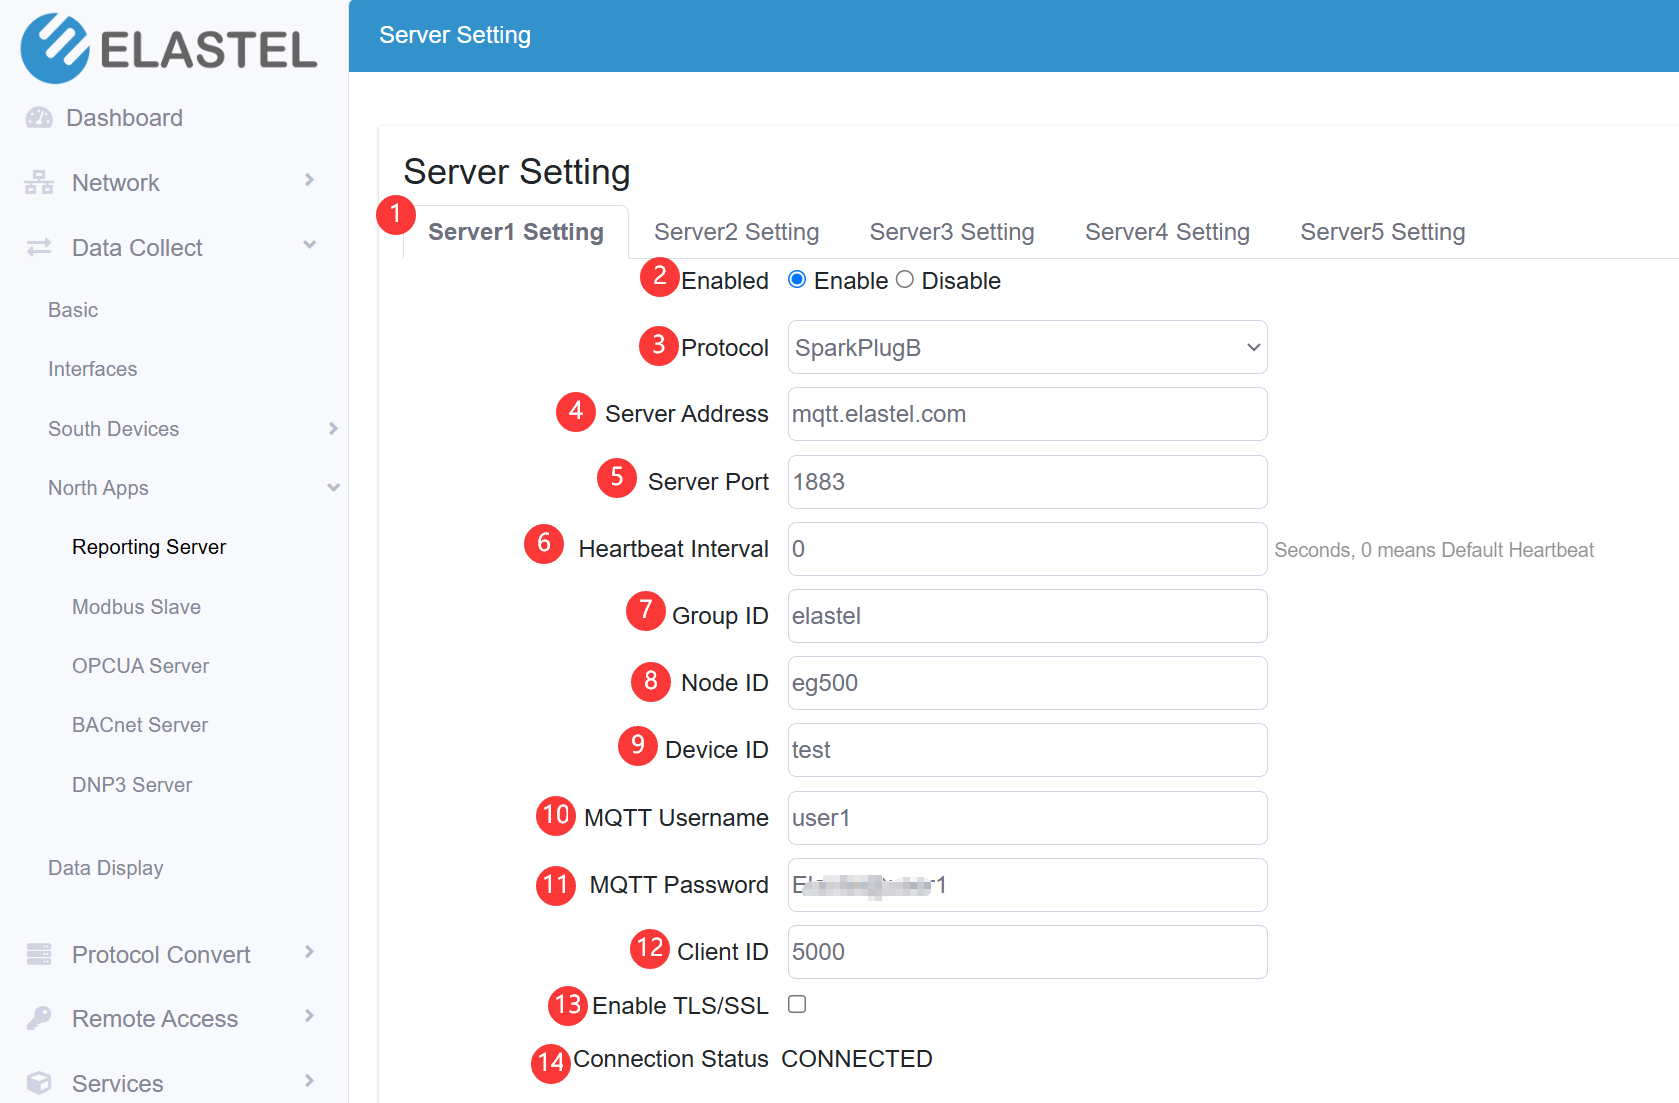
- Specify a server to configure
- Enable/Disable the server
- Select the communication protocol between Elastel gateway and the server, this section we select SparkPlugB
- Configure the Server address
- Configure the server port
- Configure the Heartbeat Interval, heartbeat is for keep alive connection between Elastel gateway and server
- Configure the Group ID
- Configure the Node ID
- Configure the Device ID
- Configure the MQTT username
- Configure the MQTT password
- Configure the MQTT client ID
- Enable TLS/SSL certification, it provide three certificate type if enabled,
- CA signed server certificate
- One-way certification, request upload CA file
- Two-way certification, request upload CA file, public and private keys
- Indicate the server connection status
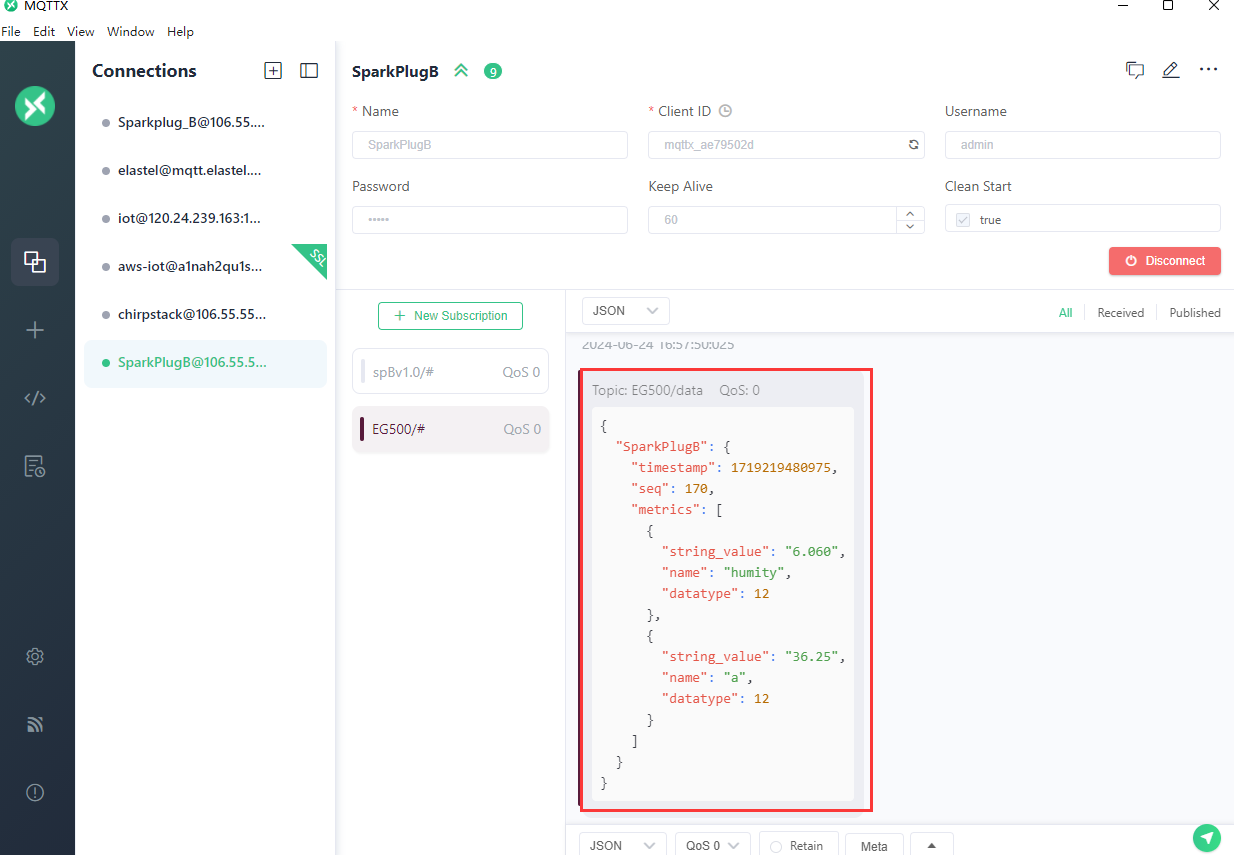
Demo, after Elastel gateway publish the data by SparkPlugB, we use a MQTTX client tool to subscribe the data, we can check the SparkPlugB specific data format and others.
TCP Protocol
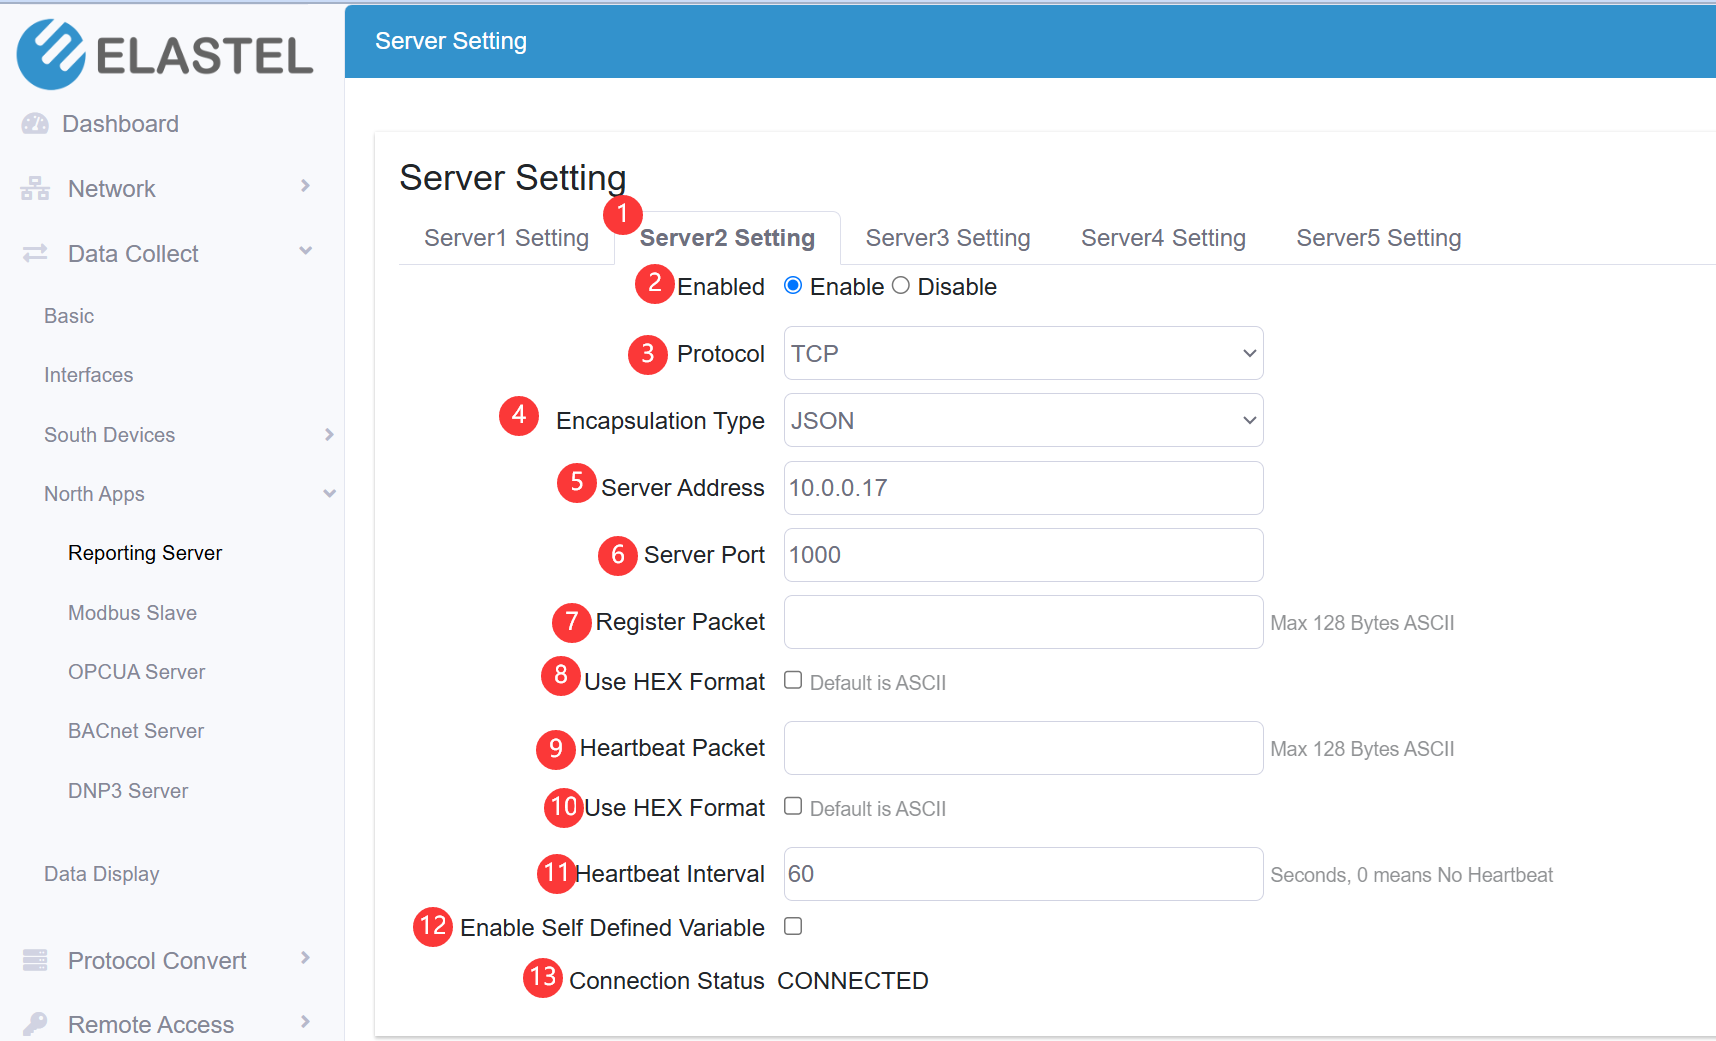
Elastel gateway act as TCP client to communicate with TCP server.
-
Specify a server to configure
-
Enable/Disable the server
-
Select the communication protocol between Elastel gateway and the server, this section we select TCP
-
Select the Encapsulation Type for data format upload to server, options: JSON, Transparent
1. JSON format
Example{ "ts":<timestamp>, "params":{ "<tag1 from south device rule>":<tag1 value>,"<tag2>":<tag2 value>… } }
{ "ts":1732876070827, "params":{ "Humidity":30.30,"Temperature":27.80,"DO0_tag":1 } }2. Transparent format
Example"Humidity":30.20,"Temperature":27.70,"DO0_tag":1 -
Configure the Server address
-
Configure the server port
-
Configure the Register packet
-
Set the register packet use HEX format, some TCP server may request that, the default is ASCII format
-
Configure the Heartbeat Packet
-
Set the heartbeat packet use HEX format, some TCP server may request that, the default is ASCII format
-
Configure the Heartbeat Interval, heartbeat is for keep alive connection between Elastel gateway and server
-
Enable self defined variable, this is specific add extra parameters in payload to match some cloud platform requirements
-
Indicate the connection status
UDP Protocol
Elastel gateway use UDP protocol to communicate with server. Please Refer the TCP protocol section for reference.
HTTP Protocol
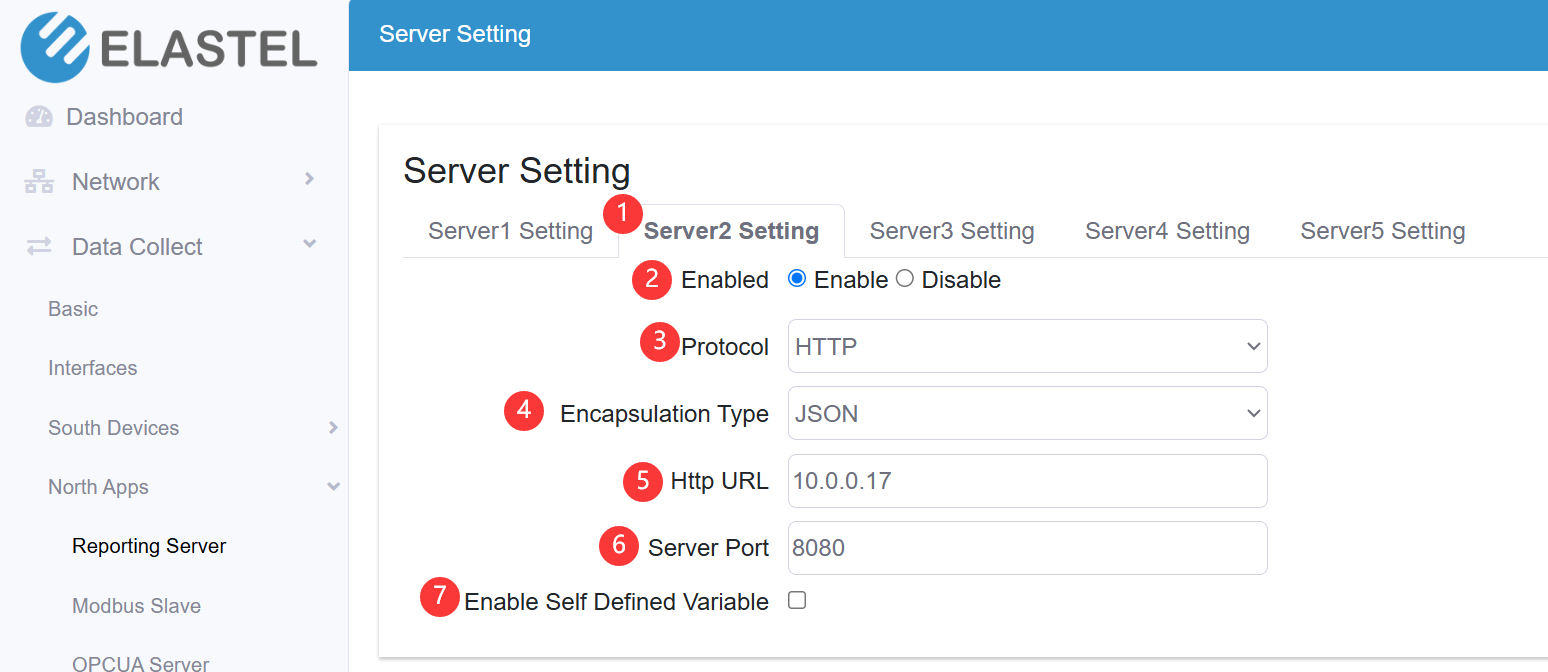
Elastel gateway act as HTTP Post to communicate with TCP server.
-
Specify a server to configure
-
Enable/Disable the server
-
Select the communication protocol between Elastel gateway and the server, this section we select HTTP
-
Select the Encapsulation Type for data format upload to server, options: JSON, Transparent
1. JSON format
Example{ "ts":<timestamp>, "params":{ "<tag1 from south device rule>":<tag1 value>,"<tag2>":<tag2 value>… } }
{ "ts":1732876070827, "params":{ "Humidity":30.30,"Temperature":27.80,"DO0_tag":1 } }2. Transparent format
Example"Humidity":30.20,"Temperature":27.70,"DO0_tag":1 -
Configure the HTTP URL
-
Configure the server port
-
Enable self defined variable, this is specific add extra parameters in payload to match some cloud platform requirements
The post format example would like,
POST / HTTP/1.1
Host: 10.0.0.17:8080
User-Agent: curl
Accept: */*
Content-Type: application/json
Content-Length: 92

{
"ts":1732882000675,
"params":{
"Humidity":30.40,"Temperature":28.00,"DO0_tag":1
}
}
